MoversSuite Administration > Personnel > Personnel
Use Personnel Setup to define MoversSuite Application and Customer Web Portal users along with defining crew, drivers, and other employees referenced by the MoversSuite application as well as external interfaces.
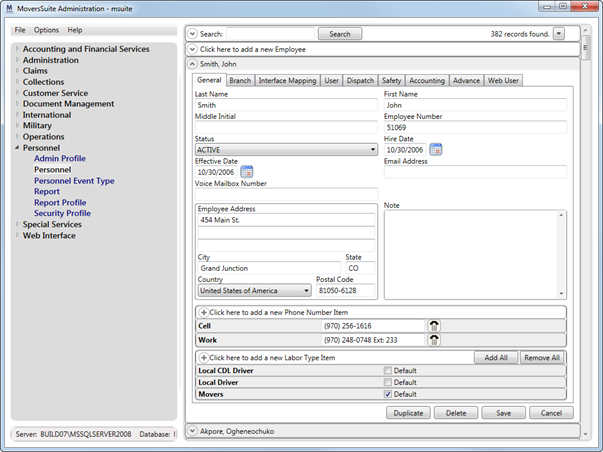
Figure 2: Personnel Setup in MoversSuite Administration
|
Important |
|
A company should consider personnel records for assigning move management roles to employees and for user access, do not consider it as a human resource archive. MoversSuite recommends adding data only when needed by the application. |
The following table describes the fields and functions within this setup.
|
Field |
Description |
|
See Merging Personnel Records for details on merging similar personnel records into a single employee/user record. Refer to Record Management
in MoversSuite Administration for functions available through the
drop-down options ( | |
|
General tab | |
|
View the User Details List Report to see a list of all personnel that includes their profile settings, labor type, and username by branch. | |
|
Last Name |
Enter the last name of the employee/user (up to 26 characters). IGC Software Integration Note: Salespersons that will be sending survey information to IGC will need to have their First Name, MI, and Last Name match exactly with what is set for them within the IGC QuickMove application. Refer to Send to IGC for Survey topic for more information.
|
|
First Name |
Enter the first name of the employee/user (up to 16 characters). |
|
Middle Initial |
Enter the middle initial of the employee/user (1 character). |
|
Employee Number |
Enter the number assigned by the organization to identify this employee (up to 8 characters). |
|
Status |
Select a value that represents the current state of the employee record. The following default values are available: ACTIVE INACTIVE REVIEW Only employees with a Status of “ACTIVE” are assignable within MoversSuite, i.e. available as options within personnel fields such as Salesperson field in Name, Address, Phone.
Setup for Local Dispatch: Status must be set to ACTIVE in order for the worker to be assignable; crew will not show up in the Assign Crew grid if they are not active.
|
|
Hire Date |
Enter or select the date of hire for the employee (in MM/DD/CCYY format). |
|
Effective Date |
Enter or select the date that the employee began effectively working for the organization (in MM/DD/CCYY format). |
|
Email Address |
Email address of the employee (up to 50 characters).
Setup for Local Dispatch: All personnel receiving email notification upon a dispatch status change will need to have a valid email address associated to their personnel record. See Automatic Email Service for more information.
|
|
Voice Mailbox Number |
Enter the voice mail box number for the employee (up to 5 characters). |
|
Employee Address |
|
|
Address |
Enter the employee address (3 lines up to 256 characters each). |
|
City |
City of the employee address (up to 16 characters). |
|
State |
State abbreviation of the employee address (2 characters). |
|
Country |
Select the country for the employee address from the list of those defined within Country Code Setup. |
|
Postal Code |
Postal code of the employee address (up to 10 characters). |
|
|
|
|
Note |
Enter a message regarding the employee. |
|
Phone Number Item |
|
|
User this section to capture phone numbers for the employee/user and categorize them using the following options: Alternate Fax Home Mobile Pager Work Enter phone numbers directly or use the drop-down phone
control (
Right-Click Options
Remove Phone Number Choose option to remove the selected record
| |
|
Labor Type Item | |
|
Associate this employee/user record to one or more Labor Type (or roles) within the organization.
Right-Click Options
Remove Labor Type Choose option to remove the selected record
| |
|
Labor Type |
Assign one or more types to the employee/user from the list of those defined within the Labor Type Setup. The Labor Type defines which role the person has within the company. It also controls how the person appears in MoversSuite based on the Labor Type Setup. For example, Labor Type of “Sales” allows the person to display within the Salesperson drop-down in Sales Lead Information and types with the “Available in Local Dispatch” flag set allow the person to be assignable as crew in Local Dispatch. Refer to the Default Labor Types topic for a descriptions and usage of system Labor Types.
Setup for Local Dispatch Set dispatchers in Local Dispatch to Labor Type of “Disp.” Link all personnel needing to be available for crew assignment functions to Labor Types that have the “Available in Local Dispatch” flag set in Labor Type Setup.
Setup for Long Distance Dispatch Set dispatchers in Long Distance Dispatch to Labor Type of “LD Disp.” Link all personnel needing to be available for trip assignment functions to Labor Types that have the “Available in Long Distance Dispatch” flag set in Labor Type Setup.
Refer to the Accounting tab section below to learn more about setting up advances and commissions on employees.
|
|
Default |
Check the Default flag to mark the appropriate Labor Type as the default for this record. This instructs the application to auto-assign this employee using the corresponding labor type to services in Local Dispatch. See Auto Assign Crew for more information. |
|
Branch tab |
|
|
Use this tab to associate branch records to employees and users. Employees can be assigned only to branches listed here. Likewise, users can only access orders and functionality for branches listed here.
Right-Click Option
Remove Branch Choose option to remove the selected record
| |
|
Default Branch |
Select a branch to be the default for this employee from the list of Branch Item records. Third party applications reference the Default Branch. For Driver Advances, verify that the branch set here has the correct Company Number for the driver in Branch Setup. For Customer Web Portal, New Order functionality will reference this branch when creating a lead through the portal.
Setup for dispatchers Dispatchers can manage services for assigned branches only. For Local Dispatch, the Default Branch here is what the Service Branch on the Dispatch Center tab is set to upon initial access to Local Dispatch.
|
|
Branch Item |
Select the branches that this user can access orders from the list of records defined in Branch Setup.
Setup for Local Dispatch Crew are available for assignment to services for branches listed here or as part of a Dispatching Common View.
|
|
Interface Mapping tab |
|
|
Use this tab to link the employee to one or more external systems that may be required for exchanging data between MoversSuite and another systems. The options below allow you to define one or more records for an externally-defined User ID. You can add unique records for each Interface, Labor Type, User ID combination. You can also define a record for a user to be available for a particular branch. You can also set a default record to apply to all branches not associated to the mapping record for the user. | |
|
Right-Click Options These are the options available to you through right-click options on the Interface Mapping grid. Of note, there must be at least one record defined in order to access these options.
Duplicate Employee Interface Mapping This option opens the Add Employee Interface Mapping dialog with the data of the copied record filled in. Users can quickly update this information and press Add to make a new record.
Duplicate Employee Interface Mapping Selecting this option removes the record through a confirmation dialog.
| |
|
Interface |
If the employee record is needed when exchanging data with external systems, then use this section to map the employee to those defined within XML Interface Setup. |
|
User ID |
Enter the identification number of the employee as recognized on the specified interface (up to 256 characters). |
|
Labor Type |
Set the appropriate type that the User ID applies to for the specified interface. On some external systems, the Labor Type must match the record being exchanged. Only Labor Types assigned through Labor Type Items on the General tab display here. Refer Labor Type Setup to for record definitions. |
|
Branch |
If an interface mapping for the employee applies to a particular branch, then select the Branch from the list. If data can exchange between MoversSuite and an external system only under a particular branch or branches, then make sure that all appropriate records are defined and/or an appropriate default is marked (see notes for the next field). See Branch Setup for more information on this setting. |
|
Use as default when Branch not defined |
Mark a particular record as the default to apply to all cases not specifically defined with a branch for this user. For example, if the user has an ID that applies to multiple branches, then create the mapping for one record and mark that record as the default; it will be referenced when no specific mappings exist for the user.
Note: Only one record can exist as a default for an Interface, User ID, and Labor Type combination. If you mark a record as the default, it removes the flag that may have been set on another record based on the Interface and Labor Type combination.
|
|
User tab |
|
|
Define user login credentials and grant user access to MoversSuite functionality using this tab. Users defined with login credentials count towards the number of licensed users (displays as Existing Users within Licensing Setup). | |
|
|
Remove MoversSuite User Use this function to remove the user record associated to this particular personnel record. This removes this person from having login ability to access the MoversSuite and/or MoversSuite Administration application; it does not affect tehir personnel record otherwise. You will be prompted to confirm the request to remove the user record for the personnel record you are on. |
|
User ID Password |
Enter a unique identifier and password for the user to log into MoversSuite and/or MoversSuite Administration (if Admin Profile is set). Only people you wish to login and use MoversSuite should be defined with a User record. Avoid creating User records for persons not logging into MoversSuite or MoversSuite Administration, such as drivers, crew, surveyors. The User ID and Password are credentials needed when logging into either application. User ID can be up to 32 characters and the Password 64 characters. Each field is case-sensitive. The User ID appears in the window title within MoversSuite. The User ID (Username) and Password are referenced within Login and the Change Password and dialogs. |
|
Security Profile |
Select a profile from the list of those defined within the Security Profile Setup to grant this employee the appropriate access to MoversSuite functionality. View the Security Profile Detail Report for list of modules by labor types. |
|
Report Profile |
Select a profile from the list of those available to grant this employee access to particular reports sort forth within Report Profile Setup. View the Reports and Letters report to see documents and reports assignments for each profile. |
|
Admin Profile |
Assign the user to a profile granting access to MoversSuite Administration from the list defined within Admin Profile Setup. |
|
Force password change on next login |
Set this flag to instruct MoversSuite to bring up the Change Password dialog the next time this user logs into the application; users will not be able to log into MoversSuite unless they change their password. |
|
Dispatch tab |
|
|
Use this tab to define driver settings such as their line haul percentage and available hours. | |
|
Driver Type |
Select a type from the list created in the Driver Type Setup. Setting the Driver Type identifies the compensation type associated to a long distance driver. |
|
Driver Level |
Enter the driver classification level for the employee (up to 20 characters). |
|
Driver Number |
Enter the driver number assigned by a van line for the employee (up to 15 characters). Certain external interfaces require the Driver Number be set when exchanging data. |
|
Fuel ID |
Enter the identification number provided by the fuel supplier for this employee (up to 10 characters). |
|
Fuel PIN |
Enter the personal identification number for the employee provided by the fuel supplier (up to 10 characters). |
|
Line Haul Percentage |
Enter the line haul percentage this employee will receive from the organization for transportation revenue (up to 2 characters). The line haul percentage is the amount of a draw the employee can receive as a percentage of the revenue associated to a trip or and order. Refer to Driver Advances for more information. |
|
Van Number |
Associate this driver record to an existing resource defined within Equipment Setup. The Van Number is the primary vehicle for this driver and is set automatically within the Agents tab when assigned to trips or orders through Long Distance Dispatch. This setting is needed for automatic downloads from UniGroup (see UniGroup Downloads). |
|
Sunday Available Hours Monday Available Hours Tuesday Available Hours Wednesday Available Hours Thursday Available Hours Friday Available Hours Saturday Available Hours |
Enter expected number of hours for the expected days that the employee will be available for crew assignment within Local Dispatch.
Setup for Local Dispatch Enter the number of hours per workday that the crew can work. This setting affects what displays within the Available field in the crew assignment grid within Local Dispatch. Dispatchers will be able to assign crew beyond their Available Hours. If the allotted time goes beyond what is set for available hours, then the Available column will display the hours over their limit in red font.
|
|
Safety tab |
See Safety System for usage. |
|
Refer to Personnel Safety Setup for field descriptions. Safety information such as license expiration date and events logged on this personnel record display within the Safety Information screen. Personnel on Administrative Hold cannot be assigned to services and trips through Local Dispatch and Long Distance Dispatch, respectively. | |
|
Accounting tab | |
|
This tab allows you to define an employee as being commissionable. In order for a person to receive a commission or an advance (Local Dispatch and Long Distance Dispatch), the Vendor and at least one Commission Plan must be defined for the appropriate Labor Type(s) (Labor Type Setup). Only those Labor Type records defined for the person through the General tab list in this section. The listing displays available Labor Type associations along with the vendor account information. If no vendor is set for the labor type, the record displays, “not commissionable.” | |
|
Vendor |
Link the employee to a vendor account defined in Microsoft Dynamics GP for the appropriate Labor Type. Commission and advances generated for this vendor affect financial reporting in Microsoft Dynamics GP. |
|
Effective Date Basis |
This setting determines which MoversSuite date is looked at to determine the rates in effect. For example, if the Effective Date Basis is set to “Current Date,” then the Commission Plan detail record in which the current system date falls within its effective date range is referenced for computing commissions for the employee. The following options are available: Current Date Actual Delivery Date Actual Load Date SIT Delivery Out Date Refer to the Effective Date Basis description within Commission Plan Setup. |
|
Hourly Wage |
Provide the wage for estimating labor costs associated to dispatched services (in dollar and cents). See for Job Costing and Job Costing Setup and Administration more information. |
|
Commission Plan Details | |
|
This section is used to assign commission plan to the employee. | |
|
Commission Plan |
Assign this employee to a Commission Plan as defined within the Commission Plan Setup. Optionally set a date range for the plan to be in effect for this employee. If the effective date range is not set, then the plan is by default in effect. |
|
Effective Start Effective End |
Enter the date range that this commission plan record is in effect. If no date range is specified, then the plan is considered in effect indefinitely; the record will display “No Start Date” and “No End Date” depending on whether either or both dates are set or not. Note: Separate effective dates may be in effect within Commission Plan Setup records, as well. |
|
Advance tab | |
|
Use this section to set account and cap data for Driver Advances. Refer to Driver Advances Setup and Administration for more information on fields on this section.
Setup for Local Dispatch Drivers receiving advances must have this Advance information defined.
| |
|
Account Number |
Enter account number provided by a banking services provider if uploading advance transactions to the banking service provider (up to 16 characters). Note: More than one driver can reference the same Account Number.
|
|
Account ID |
Enter the unique identification for the driver provided by a banking services provider if uploading advance transactions to the banking service provider (up to 16 characters). |
|
Advance Cap Trip |
Enter the maximum amount that an employee can assigned per trip (up to 10 digits). See Advance Limit for details. |
|
Advance Cap Order |
Enter the maximum amount that an employee can assigned per order (up to 10 digits). See Advance Limit for details. |
|
Web User tab | |
|
The Web User tab defines the settings needed by customer accounts needing access to the Customer Web Portal. Refer to the Customer Web Portal Setup and Administration section for more setup information. | |
|
|
Remove Web Portal User This function removes the user record associated to this particular personnle record; they will no longer be able to access the Customer Web Portal. This function clears the data within this Web User tab only. It does not affect the personnel record otherwise. You will be prompted to confirm the request to remove the portal user. |
|
User ID Password |
Enter a unique identifier and password for the user that accesses the Customer Web Portal (maximum characters for User ID is 32 and Password is 64 characters). Each field is case-sensitive. |
|
Company Name |
Enter a title to display within the Customer Web Portal for logged in users (up to 12 characters). |
|
Login Count |
This read-only field displays the number of times this particular user logged into the Customer Web Portal. Changing User ID resets this counter. |
|
Profile |
Select a profile from the available list of records defined within Tasks Setup. The application compares this setting to what is set for the Task Definition in Name, Address, Phone; the orders matching the Profile will be what is available for this user to view through the Customer Web Portal.
Note: MoversSuite suggest defining Task Definition records for a particular account. Doing so will restrict access by account representatives to account-specific orders.
|
|
User Type |
This setting determines which of the following data types Customer Web Portal application will search through and display results for:
Electronics This option instructs the application to use the Electronics Search page and display results with Electronics Data.
Household Goods This option instructs the application to use the Household Goods Search page and display results with Household Goods Data.
Special Commodities This option instructs the application to use the Special Commodities Search page and display results with Special Commodities Data.
For best results, choose a User Type similar in nature to the selected Profile.
Note: The application will base product group and company roll out on the Task Group of the order set through Name, Address, Phone.
|
RELATED TOPICS:
 ) for these
records.
) for these
records. ).
).
