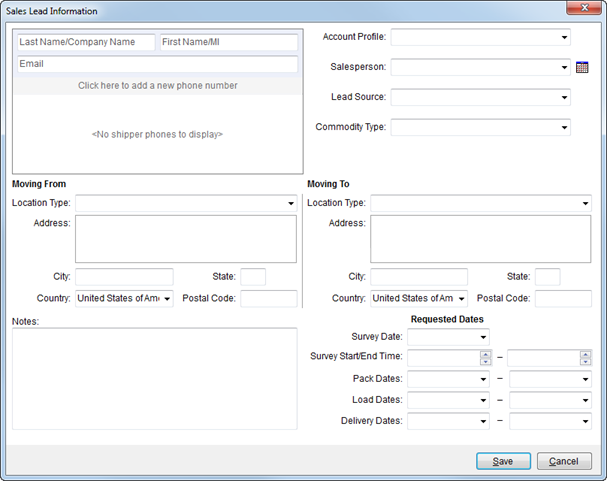
Use the Sales Lead Information screen to capture
relevant sales data regarding a potential order. Once the basics needed to
establish the lead have been entered, press Save and the Order
Information screen will appear in edit mode. An Estimate Number will be
generated based on branch chosen through the Select a Branch option and what is defined for the
Estimate Prefix and Estimate Number in Branch Setup.
Figure 20: Sales Lead Information screen
Described in the table below are the fields and functions available within the Sales Lead Information screen.
|
Field |
Description |
|
Shipper Contact Information |
|
|
Last Name/Company Name |
Enter the last name or company name of the shipper (up to 26 characters). The name entered here is referenced throughout the application and displays on various reports and invoices. |
|
First Name/MI |
Enter the first name of the shipper (up to 16 characters). The first name is often combined with the LastName/Company Name to create a shipper name. |
|
|
Enter the email address for the shipper (up to 120 characters). Once the record is saved, users can click on the email address set here and the application will evoke the system default mail utility (such as Microsoft Outlook) placing the email address set here as the message recipient. |
|
Phone Numbers |
Select a phone type and enter the corresponding phone number for each contact phone number provided for the shipper. Phone types are defined with Shipper Phone Type Setup and affect several imports including those from Atlas, SIRVA, and UniGroup.
Phone Numbers for most phone types affect Bookmarks data (see Order Information Bookmark Fields).
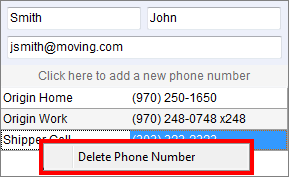
Use a right-click option to remove a phone number.
Figure 21: Right-click option to remove a phone number entry
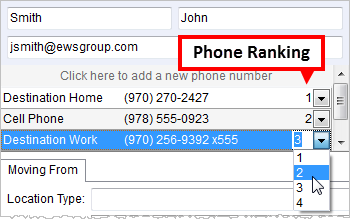
Users can rank phone numbers to give them a priority in the listing. Lowest numbers appear at the top of the listing and non-ranked numbers list after the ranked ones.
Figure 22: Phone number ranking
|
|
|
|
|
Account Profile |
Associate a profile to the order by selecting from the list of values defined within Account Profile Setup. |
|
Salesperson
|
Select the name of the person responsible for the sales lead. Salesperson is maintained within the Name, Address, Phone tab. Note: If a salesperson is associated to the selected profile then it will overwrite any value set for the Salesperson when an Account Profile is selected. Salesperson Calendar Opens the calendar of the selected Salesperson. This feature also creates summary data of the request that can be pasted into a new message, new appointment, etc. See Microsoft Outlook Calendar Integration for details. |
|
Lead Source |
Select a value from the list of available records defined within Lead Type Setup. This value is set within the Lead Source field in Move Information. |
|
Commodity Type |
Select a value from the list of available records defined within Commodity Type Setup. This value is set within the Commodity field in Move Information. |
|
Moving From |
Set the origin address and contact information as described on the Name, Address, Phone tab. |
|
Moving To |
Set the destination address and contact information as described on the Name, Address, Phone tab. |
|
Notes |
Enter the text of the note saved as a message with the Subject of Sales Lead and Type of Note as Lead. This message will be visible through the Notes tab of the estimate. |
|
Requested Dates |
|
|
Survey Date Survey Start/End Time |
Set the date and time that the survey or estimate took place. Manage these fields through the Agents tab. See Date Fields for data entry information. |
|
Pack Dates |
Set the date ranges requested by the shipper for packing. This date range appears within the Range tab in Move Information. See Date Fields for data entry information. |
|
Load Dates |
Set the date ranges requested by the shipper for loading. This date range appears within the Range tab in Move Information. See Date Fields for data entry information. |
|
Delivery Dates |
Set the date ranges requested by the shipper for delivery. This date range appears within the Range tab in Move Information. See Date Fields for data entry information. |
|
Upload to Quotes to Go |
Upload to Quotes to Go If UniGroup Quotes to Go Upload is enabled for the selected branch of the order, then a flag will display. Checking this flag instructs the application to send the lead information capture here to the Quotes to Go system. |
|
|
Save (Alt+S) Pressing Save will close the dialog after saving any changes made to the record. |
|
|
Cancel (Alt+C) Pressing Cancel will close the dialog without adding a lead. |
RELATED TOPICS:
Change a MoversSuite Order Number or Branch
 to access