Appointments can be set up for your salespeople through the Salestrak module. Appointments can be for surveys, meetings, vacations, etc. The SalesTrak module provides several ways to view the appointments.
•Exporting Appointments to Outlook
•Importing Appointments from Outlook
Appointment Editing
Appointments can be viewed from the Sales Scheduling screen. However, to edit them, the Appointment Editing screen must be opened. This is done by right clicking on a cell in the Scheduling screen. A popup menu will offer the choice of creating a new appointment, editing an existing appointment, adding a salesperson “out” time, or editing a salesperson “out” time. “Out” times are appointments that are not with prospects, but the times for which are not available for prospect appointments, such as meetings, vacations, etc.
Editing an appointment will auto-generate a memo for that prospect if the date, time, or contact is changed, or if the appointment is canceled. Also, if a contact has the "auto e-mail" flag set to "Y" in the Contact Maintenance form, and has an e-mail address entered, the default e-mail program will be launched if an appointment date, time, or contact is changed. The "To", "Subject", and "Body" fields will have system-generated text already entered, which can be altered, if desired, before sending the confirmation e-mail to the contact.
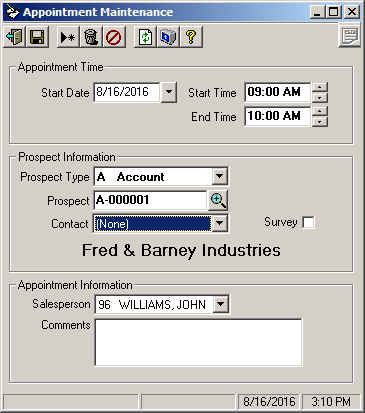
Create Appointment
1.Select the SalesTrak module.
2.Select Entry then Appointment Scheduling.
3.Select the salesperson and enter the password. To view all salespeople, enter the high security code.
4.While in the Day view, right click in the hour in which you want to schedule the appointment.
5.Select Add Appointment.
6.Enter the Start Date and Start Time.
7.Select the Prospect Type and Lookup Prospect Number.
8.Complete the appointment information.
9.Enter Comments (optional).
10.Select the  icon to save the appointment.
Field Descriptions
Name |
Description |
Appointment Time |
|
Start Date |
This field displays the starting date of the appointment. If the appointment is something that will span several days, such as a vacation, for entering the starting date of the “out” time. |
End Date |
This field displays the end date of the appointment for Out Time Scheduling only. |
Start Time |
This field contains the start time of the appointment or the “out” time. |
End Time |
This field displays the end time of the appointment. The end time is manually entered. |
Prospect Information |
|
Prospect Type |
This field identifies the prospect type. Select M for moving and storage prospects or A for account prospects. A type must be selected for all prospect appointments. |
Prospect |
This field displays the prospect for this appointment. Click the |
Contact |
This field displays the contact for this appointment. Click the |
Survey |
This field determines if this is a survey appointment. Select Y if this prospect appointment is a survey, and N if it is not. If this field is set to Y, then this appointment date will be set as the survey date in the Prospect Entry form. |
Appointment Information |
|
Salesperson |
This field displays the salesperson for this appointment. If you are logged on as a specific salesperson, this field displays the selected salesperson and cannot be changed. If you are signed on as a high security user, you can select the salesperson for this appointment. |
Comments |
This box is used to enter any comments for the appointment. Up to three lines of 30 characters each can be entered. |
 lookup icon to search for the correct prospect.
 to select from a list of available contacts for this prospect.
Out Appointment
1.Select the SalesTrak module.
2.Select Entry then Appointment Scheduling.
3.Select the salesperson and enter the password. To view all salespeople, enter the high security code.
4.Right click in the hour in which you want to schedule the appointment.
5.Select Add Salesperson "Out" Times.
6.Enter the Start Date and Start Time.
7.Enter the End Date and End Time.
8.Select the Salesperson.
9.Enter Comments (optional).
10.Select the icon to save the appointment.

Field Descriptions
Name |
Description |
Appointment Time |
|
Start Date |
This field displays the starting date of the appointment. If the appointment is something that will span several days, such as a vacation, for entering the starting date of the “out” time. |
End Date |
This field displays the end date of the appointment for Out Time Scheduling only. |
Start Time |
This field contains the start time of the appointment or the “out” time. |
End Time |
This field displays the end time of the appointment. The end time is manually entered. |
Appointment Information |
|
Salesperson |
This field displays the salesperson for this appointment. If you are logged on as a specific salesperson, this field displays the selected salesperson and cannot be changed. If you are signed on as a high security user, you can select the salesperson for this appointment. |
Comments |
This box is used to enter any comments for the appointment. Up to three lines of 30 characters each can be entered. |
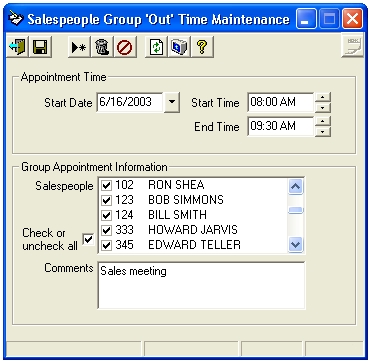
Group Appointment Editing
To create a group "out" appointment:
1.Select the SalesTrak module.
2.Select Entry then Appointment Scheduling.
3.Select the salesperson and enter the password. To view all salespeople, enter the high security code.
4.Right click in the hour in which you want to schedule the appointment.
5.Select Add Group "Out" Appt.
6.Enter the Start Date and Start Time.
7.Enter the End Time.
8.Select the Salespeople by checking the box next to the salespeople for this appointment.
9.Enter Comments (optional).
10.Select the icon to save the appointment.
Field Descriptions
Name |
Description |
Start Date |
This field displays the starting date of the appointment. If the appointment is something that will span several days, such as a vacation, for entering the starting date of the “out” time. |
Start Time |
This field contains the start time of the appointment or the “out” time. |
End Time |
This field displays the end time of the appointment. |
Salespeople |
This box displays all SalesTrak salespeople. This is used for setting an “out” time (sales meeting, for example) for multiple salespeople at once. All salespeople that have a check in the box next to their name will be included in this ‘group’ appointment. This box can only be accessed when you are signed on as a high security user and select the Add Group “Out” Appt or Edit Group “Out” Appt option. |
Check or uncheck all |
This box is used to select the salespeople for a group "out" appointment. Checking this box will select all the salespeople. To unselect all salespeople, first check this box, then uncheck it. |
Comments |
This box is used to enter any comments for the appointment. Up to three lines of 30 characters each can be entered. |
Appointment Slip
This is an optional report that prints extensive information on a single appointment, or a range of appointments based on salespeople and appointment dates. If the form is selected from a menu, the user can select which salespeople, and which dates to print the report(s) based on. This form can also be called from the Prospect Entry or by right clicking an appointment in the Scheduling Calendar. These options will load the form with the selected appointment only loaded in the form. Below is the form when loaded for selecting a range of salespeople and dates.
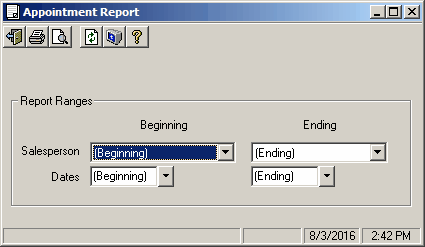
Field Descriptions
Name |
Description |
Salesperson |
Enter the beginning and ending salespeople for the report. |
Dates |
Enter the first and last appointment dates for the report. |
Below is how the form appears when loaded from Prospect Entry form or the Scheduling Calendar. Note that the Report Parameters are disabled, and the report will print for only this appointment.
