SalesTrak sales scheduling allows you to view and enter salesperson appointments. Three screens allow scheduling by month, week, or day. The sales schedule opens to the current day by default. If opened by a specific salesperson, the schedule will display their specific schedule. If opened as a high security user (See SalesTrak Security Login), the schedule will display schedule information for all salespeople.
Screens
Name |
Description |
Monthly schedule information for all salespeople. |
|
Weekly schedule information for all salespeople. |
|
Daily schedule information for all salespeople. |
|
Monthly schedule for a specific salesperson. |
|
Weekly schedule for a specific salesperson. |
|
Daily schedule for a specific salesperson. |
|
Enter or edit an appointment. |
Salespersons Monthly Schedule
The Salesperson Monthly Schedule screen give you an overview of all appointments scheduled for all salespeople during the selected month. The total number appointments scheduled for each day is indicated. Additional information can be displayed by clicking on a day. This screen is only available to high security users.

Field Descriptions
Name |
Description |
|
These arrows move the calendar to the previous, or next month. This can also be done by clicking <Shift> + F6 for previous month , or <Shift> + F7 for next month. |
The high security version of the schedule displays the number of appointments for all salespeople for each day in a given month. Double clicking on one of the days will bring up the schedule for all salespersons for that day. The buttons on either side of the month/year label move to the previous or the next month. The current date will be displayed in red, while all other days are shown in black. The blue background shows the date selected by the user.
Salespersons Weekly Schedule
This schedule grid shows the total number of appointments for each day shown, for each salesperson. It displays a seven-day period, with the first day being the current day by default, or selected by the user using the calendar control at the top of the grid.

Field Descriptions
Name |
Description |
First Day to Show |
This calendar control allows the user to select the first day to show in the seven-day period displayed. The day selected will be the day shown in the Day grid. |
Salesperson |
Double clicking on a salesperson number will show the week schedule for that salesperson only. This view gives more detailed information about each appointment. |
Date Fields |
Double clicking a date cell will change the form to the day schedule for the date double clicked. |
Cell Grid |
Double clicking on a cell within the grid will change to the salesperson at the left side of the row, and the date at the top of the column. This will open the day calendar on the date selected for the salesperson selected. |
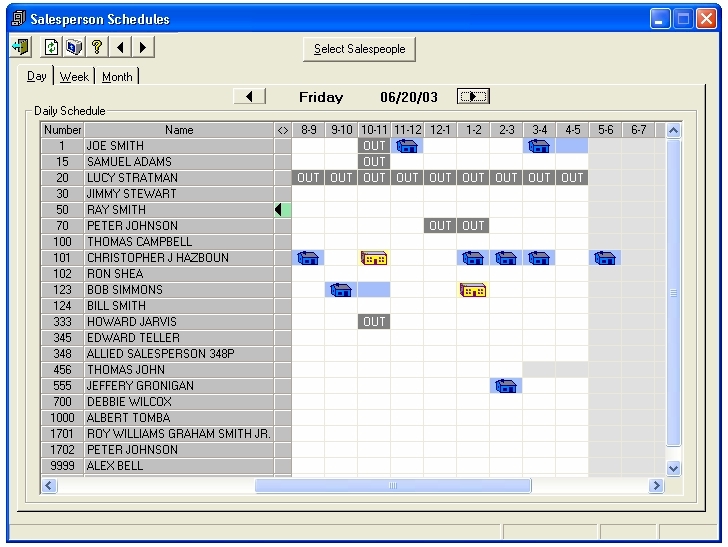
Salespersons Daily Schedule
If this screen is opened by clicking the “Show this appointment” button from either Prospect Entry or Account Prospect Entry, the appointment selected will be represented by an icon containing a red bullet. The background color of the icon will remain the same; blue for a moving & storage appointment, yellow for a national account appointment.
Field Descriptions
Name |
Description |
|
These arrows move the calendar to the previous, or next day. This can also be done by hitting <Shift> + F6 for previous day , or <Shift> + F7 for next day. |
Salespersons Daily Schedule displays an icon for each appointment for each salesperson. If an appointment covers more than one hour, the background color is filled in, but the icon is absent, so it is easy to tell quickly if there is one two hour appointment, or two separate one hour appointments adjoining. Double clicking on an icon brings up the prospect entry form for that particular prospect. Right clicking on an icon brings up a popup menu for editing the appointment, exporting the appointment to Microsoft Outlook Calendar, or (if the Appointment Slip option has been purchased) opening the Appointment Slip form with the selected appointment pre-loaded. Right clicking on an empty cell opens a popup menu with the option of adding a new appointment.
Double clicking on a salesperson or salesperson number will bring up the schedule grid for that salesperson. This grid shows much more detail about each appointment. If this form is opened from Prospect Entry or from Account Prospect Entry, the salesperson assigned to the prospect selected on the form will be shown in bold.
Hovering over an appointment with the mouse cursor brings up a text box with the name of the prospect for which the appointment is scheduled.
Salesperson Schedule, Monthly
Field Descriptions
Name |
Descriptions |
|
These arrows move the calendar to the previous, or next month. This can also be done by clicking <Shift> + F6 for previous month, and <Shift> + F7 for next month. |
Show All Salespersons |
This button changes to the schedules (all three) for all salespersons. This option is only available if you are logged on as a high security user. |
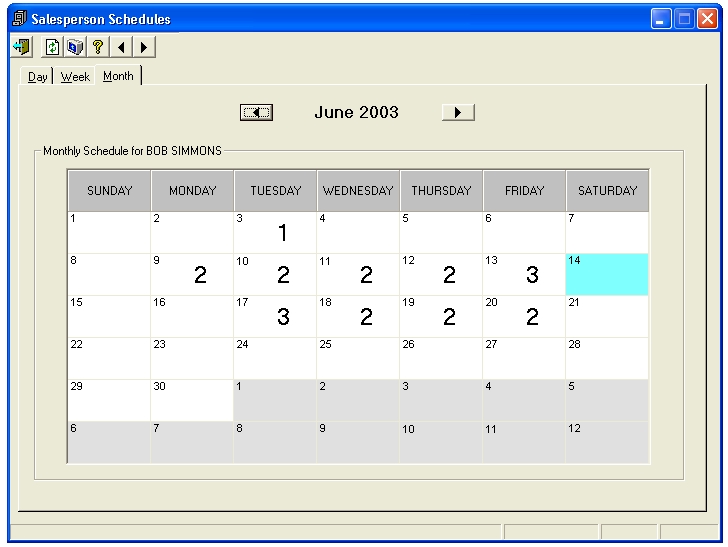
Monthly Schedule |
This view displays the number of appointments each day for a selected month for a specific salesperson. The high security user can access the individual schedules for any salesperson. If you re not logged on as high security user, the schedule shown will only be for the salesperson logged on. |
 Tip: Double clicking on a day cell will bring up the schedule for that specific day.
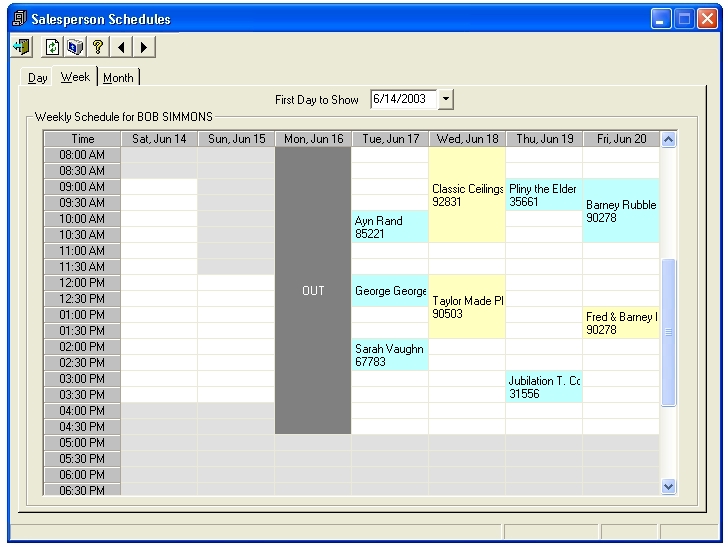
Salesperson Schedule, Weekly
Weekly Schedule for a Single User displays a seven-day period of appointments for a single salesperson. The background color is blue for a prospect, and yellow for an account prospect. Double clicking on an appointment will bring up the appropriate prospect entry screen with the selected prospect already loaded. Right clicking on an appointment will bring up a popup menu with the option of editing an appointment, exporting an appointment to Outlook Calendar, or (if the Appointment Slip option has been purchased) opening the Appointment Slip form with the selected appointment pre-loaded. Right clicking on an empty cell brings up a popup menu with the option of adding an appointment, or importing an appointment from Outlook. The first time shown on this calendar will be the earliest starting time for the salesperson selected for the period shown.
Field Descriptions
Name |
Description |
First Day to Show |
This field indicates the first day that will be shown on the calendar. This date is also becomes the selection date for the day calendar and the month calendar. |
Show All Salespersons |
This button switches to the schedule calendars for all salespersons. Only option is available if you are logged on as a high security user. |
Salesperson Schedule, Daily
Daily Scheduler for a Single User displays all appointments for a single salesperson for a single day. The day can be scrolled forward or backward with the buttons on either side of the date label, or by clicking the <Shift> + F6 for previous, or <Shift> + F7 for next day. Double clicking on an appointment brings up the appropriate prospect entry screen with that prospect already loaded. Right clicking on an appointment brings up a popup menu allowing editing of an appointment, exporting the appointment to Outlook Calendar, or (if the Appointment Slip option has been purchased) opening the Appointment Slip form with the selected appointment pre-loaded in the form. Right clicking on a blank cell opens a popup menu with the options of adding an appointment, or importing an appointment from Outlook. The first time shown in this grid will be the first time this salesperson is available for an appointment on this day.
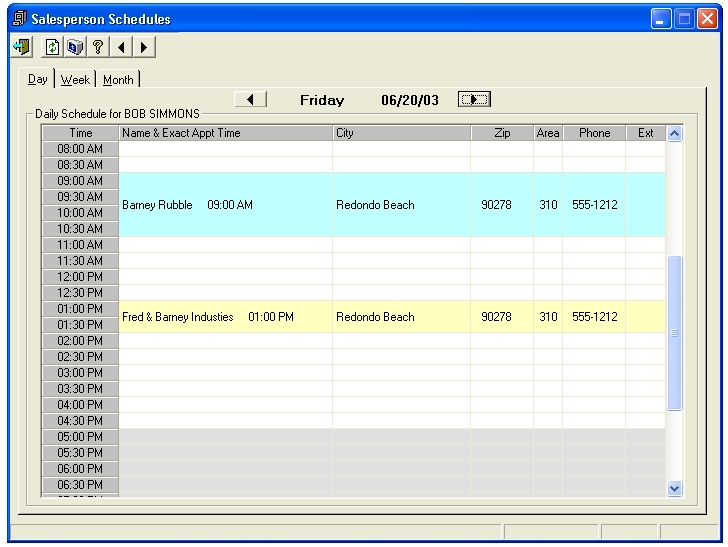


These arrows move the calendar to the previous, or next day. This can also be done by clicking <Shift> + F6 for previous day, and <Shift> + F7 for next day.
The background for prospects is light blue, and for account prospects is yellow.
Appointments can also be moved with the drag and drop method.
Select Salespeople
This screen is used to select the salespeople that will be displayed on the appointment screen.
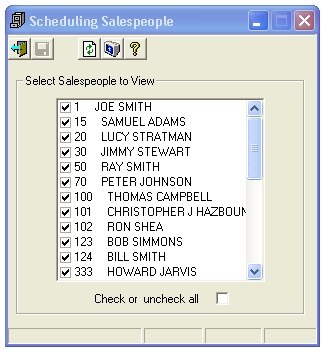
Check the salespeople you want to display on the schedule. The Check or un-check all box allows you to either select or un-select all salespeople.