Salesperson maintenance is used to change a number of settings and options for individual salespeople including passwords, schedules and commission rates. The Salesperson file is used in several areas through Vans including Order Entry, Sales Processing and SalesTrak.
Screens
Name |
Description |
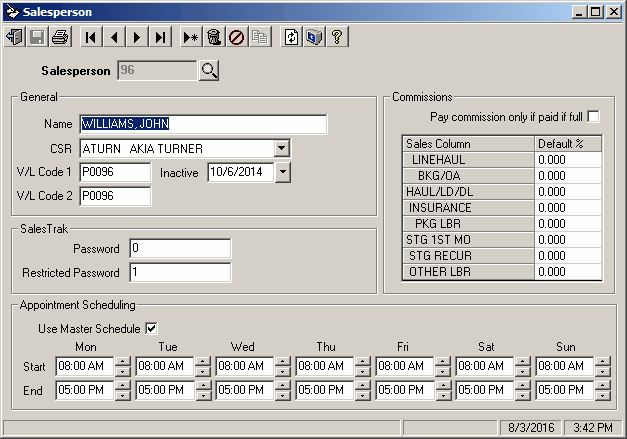
This screen is used to enter the salesperson's commission percentages, passwords, schedule, etc. |
|
This screen is used to print a listing of the contents of the Salesperson file. The list prints the salesperson's commission percentages, etc. The report can be printed to the printer or displayed on your screen. |
Salesperson Maintenance
The salesperson maintenance form contains information about your salespeople. This form defines the salesperson's commission percentages. The salesperson password and restricted password can be set here, as are weekly schedule times, if different than the master schedule start and end times.
To add a new salesperson:
1.Select Salesperson Maintenance from the File Maintenance group.
2.Enter the Salesperson Number for the new salesperson. This number is used to identify the salesperson.
3.Complete the General and SalesTrak Information portions of the form. See below for a description of these fields.
4.Click the  icon to save the salesperson record.
To use an existing record to create a new salesperson:
1.Click the  icon on the toolbar, and enter the new Sales #.
2.Hit the TAB key on your keyboard to move to the Name box.
3.Click the  icon to display a list all existing salespeople. Select the salesperson you want to copy. The entires from existing salesperson will be used to complete the form. These are the default entries and can be changed as required.
4.Once the default information has been entered, enter the new salesperson's name in the Name box.
5.Click the icon to save the salesperson record.
Field Descriptions
Name |
Description |
General |
|
Salesperson |
Each salesperson must be a assigned a salesperson number. The salesperson number can be up to six (6) digits and is used to identify the salesperson throughout Vans. |
|
The lookup button brings up a grid showing all salespersons. The selected salesperson’s number shows in the text box. |
Name |
This box is used for the salesperson's name. The salesperson name can be up to thirty (30) alphanumeric characters and is displayed in lookups and on several screens and reports throughout Vans. |
CSR |
Each salesperson can be assigned a customer service representative. The CSR selected here will be assigned to all prospects entered for this salesperson.
The assigned CSR can be changed when the prospect is entered. Click on the |
V/L Code 1 |
Text box that displays the Van Line Code #1 for this salesperson. This code can be up to nine (9) alphanumeric characters and is used in Van Line processing programs. It serves as an alias or alternate code that allows you to refer to this salesperson by the van line's identification code when uploading or downloading orders or statement reconciliation information. |
V/L Code 2 |
Text box that displays the Van Line Code #2 for this salesperson. In some cases it may be necessary for a salesperson to have a second Van Line identification number. This can occur when a salesperson can book orders for two different van lines and in that case, their van line identification code would most likely be different in each van line. |
Inactive |
Enter the date this salesperson became inacdtive. They will remain on file for historical purposes, but will no longer can be used on new orders. |
SalesTrak |
|
This is the salesperson's high security password and is used to access the salesperson's prospect and scheduling information. Choose a code for the salesperson, and enter it here. It can be up to sixteen (16) alphanumeric character in length. This password will be required to view the prospects and schedules for this salesperson. If this field is left blank, the system will not require a password, and will not restrict access to any of the prospect information. |
|
It may occasionally be necessary to allow a user to view sales appointment information without allowing them to change it. The restricted password allows users to view appointments on the scheduling calendar for this salesperson. The appointment information can not be changed. Prospect information cannot be accessed when the restricted password is used. Like the high security password, the restricted password can be up to sixteen (16) alphanumeric characters and when left blank, no password is required to view this salesperson's prospect and scheduling information. |
|
Commissions |
|
Pay commission only if paid in full |
Check this box if the salesperson only gets paid commission after the move is paid in full. |
Sales Column |
The system allows for eight (8) commission groups called 'Sales Columns'. The sales columns are used in revenue processing to determine the commission rates earned on specific types of revenue. The descriptions and default rate values for these sales columns are defined in the Driver and Sales Control file and if left blank, the commission rates from the control file will be used. |
Default % |
These values are used to set the percentage of revenue that is paid as commission to a salesperson for various jobs in the move. |
Appointment Scheduling |
|
Use Master Schedule |
This box determines which schedule is used on the scheduling grid for this salesperson. This box should be checked if this salesperson will be available for appointments during the normal working schedule defined in the Appointment Scheduling section of the SalesTrak Control file. |
The Start and End date/times are used to set the schedule for this salesperson. This is where Appointment Scheduling will determine what times are available for appointments in the schedule grid for this salesperson. Both start and end times must be entered for any day that the salesperson will be available. If start and end times are left blank, then this entire day will show as unavailable for this salesperson. |
|
Start |
The start time indicates the first time this salesperson is available on the day of the week indicated. All start times must be filled in, unless the salesperson is off on that day, in which case both start and end times must be left blank. If the Use Master Schedule box is checked, then the schedule from the SalesTrak Control file will be displayed, but can not be changed. |
End |
The end time indicates the time a salesperson’s day ends. This is the first hour for which no appointments should be scheduled. All end times must be filled in, except for off days, in which case both Start and End times must be left blank. |

 icon to display a list of valid CSRs.
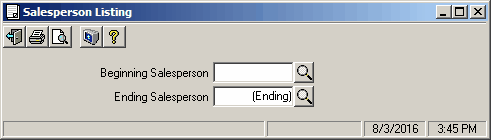
Salesperson Report
This form allows for printing a report on a salesperson or a range of salespeople showing all commission percentages.
To print a listing of the salespeople in the file:
1.Click the  icon on the toolbar.
To display a listing of the salespeople in the file:
1.Click the  icon on the toolbar.
Field Descriptions
Name |
Description |
Beginning Salesperson |
Enter the beginning Salesperson, use the |
Ending Salesperson |
Enter the beginning Salesperson, use the |