This section provides information on enabling the Atlas Integration and establishing the basic settings to support the related processes:
Atlas Settlement Statement Import
Additional setup is necessary as specified in the following areas:
Atlas SUDS Flat File Order Download Setup
Atlas SUDS XML Order Download Setup
The following setup areas are affected by the Atlas Integration and detailed steps are included in the remainder of this topic (NOTE: Items list accordingly to suggested order of entry, i.e. setup a van line, then setup agent records, etc.):
Carrier Setup (Military/Government)
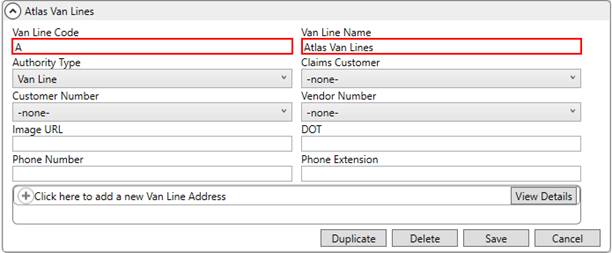
Van Line Setup
Establish a Van Line Setup record for Atlas Van Lines with a Van Line Code of A. Enter other data as needed.
Figure 13: Van Line Setup
The van line is associated to the MoversSuite Order Number.
Agent Setup
For each agent that you wish to access the Atlas Integration, link their Agent Setup record to the Van Line of Atlas Van Lines.
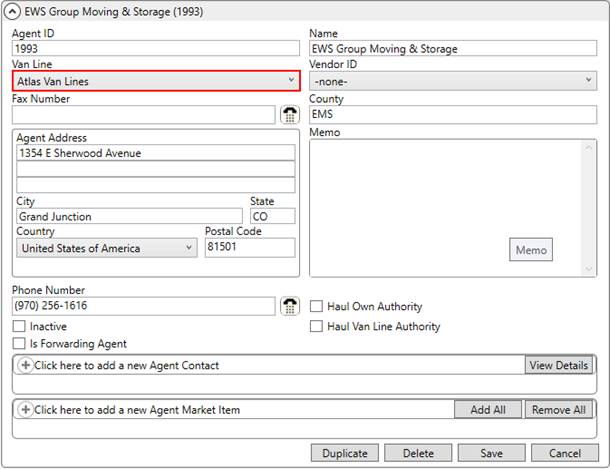
Figure 14: Agent Setup
Manage agent assignments through the Agents tab.
Branch Setup
For the branch of the orders you wish to have access to the Atlas Integration, link their Branch Setup record to the Agent and Van Line that link to Atlas Van Lines.
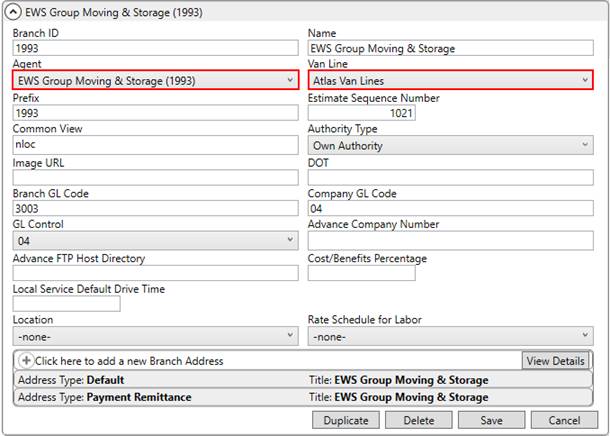
Figure 15: Branch Setup
Manage the branch of an order through the Book Order Information screen.
XML Interface Setup
Establish an interface for the Atlas Van Lines within XML Interface Setup. Link this record to the established Van Line Item for Atlas and assign an External Code of A.
The Branch Item section comprises all the branches that this Atlas interface is available. Establish items for each support Atlas branch.
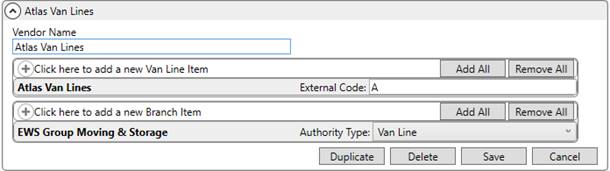
Figure 16: XML Interface Setup
XML System Setup
Use the XML System Setup to establish systems, or processes, available for the Atlas Van Line interface. Create a single record specifying the Internal System and External System as AtlasSuds. Then establish XML System Data Type Map items for the processes you wish to support on your system (specified below).
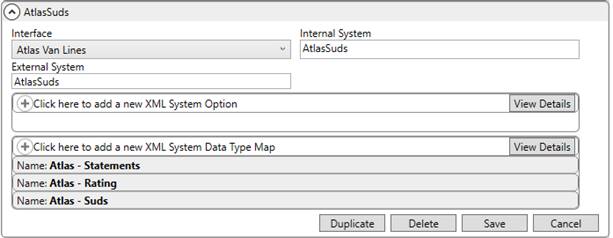
Figure 17: XML System Setup
Create XML System Data Type Map entries to support the various processes. Defining these records enables the process and allows them to be visible through the Third Party Interface Order Monitor.
Support for the Rating Download
Create a mapping for Atlas - Rating linked to the Xml System Data Type Map of Rating. This defines the process to support an Atlas Revenue Import.

Figure 18: Sample Data Type Map within XML System Setup
Support for Order Downloads
To support the Atlas SUDS Order Download processes, create a mapping for Atlas - Suds linked to the Xml System Data Type Map of Order Information.

Figure 19: Sample Data Type Map within XML System Setup
Support for Settlement Statements
Create a mapping for Atlas - Statements linked to the Xml System Data Type Map of Statement. This defines the process to support an Atlas Settlement Statement Import.

Figure 20: Sample Data Type Map within XML System Setup
Queue Service Setup
Manage the MoversSuite Queue Service through the Queue Service Setup. This setup contains global settings for all processes on utilizing the queuing service.
Optionally, you can specify a location for the following three message types to store a copy of the message file exchanged between Atlas and the MoversSuite Queue Service:
Atlas Rating Download
Atlas Suds Flat File Download
Atlas Suds Xml Download
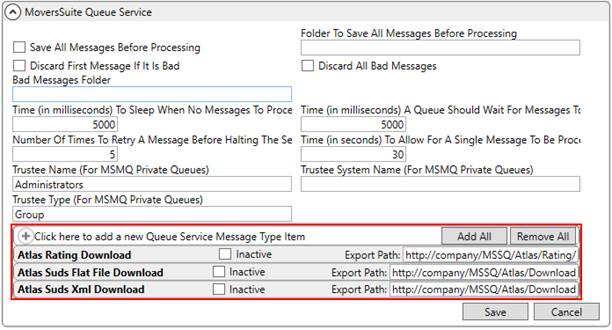
Figure 21: Queue Service Setup
Queue Service Server Setup
Create Queue Service Server Setup records to establish server records for each supported Atlas process and manage the message files interpreted by the MoversSuite Queue Service.
Refer to the following topics for details on setup needed to support the specific process:
Atlas SUDS Flat File Order Download Setup
Atlas SUDS XML Order Download Setup
Carrier Setup
The Document Type utilized within the Atlas Settlement Statement Import must match Payee Code values assigned as Carrier Payee Codes for supported Carrier Setup (Military/Government) record. These are needed to identify the carrier record.
Contact Atlas for the latest list of supported carrier payee codes.
Manage carrier assignments through the Military/Government tab.
Commodity Setup
Establish a link between MoversSuite and the commodity codes supported by Atlas Integration by creating Commodity Type Setup records and linking the following to the Atlas Van Lines interface.
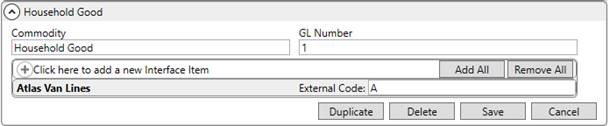
Figure 22: Commodity Type Setup
|
External Code |
Description |
|
A |
Household goods |
|
B |
Special Products (SPD B) |
|
C |
CTD |
|
G |
Smart Move (ACC G) |
|
J |
ALI |
|
L |
LOG |
Manage commodity assignments through the Move Information tab.
Item Codes and Service Codes Setup
Establish Service Codes supported by Atlas Integration and link them to Item Codes to support rating and settlement processes. Utilize the Service Code Setup to establish the codes supported by Atlas and then link them to Item Code Setup records through the Service Code setting.
Utilize item and service codes through Payment Management and Revenue Entry modules.
Note Type Setup
Verify that the following Van Line Code values are established within Note Type Setup. This mapping is utilized to link incoming notes to MoversSuite types.

Figure 23: Note Type Setup
|
Van Line Code |
Note Type |
|
092 |
Dispatch Remarks |
|
3RDPTY |
Third Party |
|
ACAUTH |
Account Auths |
|
ACTAUT |
Account Autos |
|
ACTCHG |
Account Chrgs / Apps |
|
ACTGEN |
Account General |
|
ACTINV |
Account Inventory |
|
ACTOD |
Account Orig / Dest |
|
ACTSIT |
Account Storage |
|
ACTWTD |
Account Wgts / Dates |
|
ADJ |
Adjustments |
|
ATLACC |
Atlas Accel |
|
AUTHS |
Authorization |
|
B |
Billing |
|
BKGRCK |
Background Checks |
|
C |
Company |
|
CA |
Carrier |
|
CADEC |
CADEC Data |
|
CASLBR |
Casual Labor |
|
CKPAY |
Check |
|
CLM |
Claims |
|
CMD |
Commodity |
|
COLL |
Credit & Collections |
|
COMB |
LoadPin |
|
CONTPG |
Container Program |
|
COPRO |
Company Profile Only |
|
CSTSVC |
Customer Service |
|
CUSTOM |
Customs Seals |
|
D |
Driver |
|
DELAY |
Delay Location |
|
DI |
Delivery Instruction |
|
E |
EDI |
|
FILE |
File |
|
LBRRDY |
Labor Ready |
|
LI |
Loading Instruction |
|
LOGS |
Log Notes |
|
NONCOM |
Non-Compliance |
|
NOTIFY |
Notifications |
|
O |
Order |
|
P |
Pay To |
|
PAYREC |
Payment Received |
|
R |
Trailer |
|
REJ |
Rejection |
|
RWEIGH |
Reweigh |
|
S |
Settlement |
|
SAFETY |
Safety Notes |
|
SR |
SERV REQ |
|
T |
Tractor |
|
TA |
Task |
|
TANKSZ |
Tank Sizes |
Utilize note types when adding, editing, or viewing notes from within the Notes tab.
Payment Type Setup
Link payment types to the Atlas interface for the following codes to support the Atlas Settlement Statement Import process.
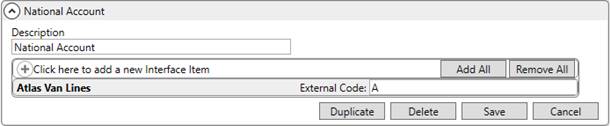
Figure 24: Payment Type Setup
|
External Code |
Description |
|
A |
National Account |
|
C |
Government Non Military |
|
E |
Military |
|
F |
COD |
|
I |
409 |
|
J |
Government Services Agency |
|
L |
Part NAC/Part COD |
|
M |
Split NAC |
|
O |
409 Managed |
|
P |
Agent To Bill |
|
Q |
409 Outsourced |
Manage the payment type of an order through the Billing Information tab.
Personnel and Security Setup
Update Personnel Setup records for employees that link to Atlas based on their user identifiers. Create Interface Mapping records for supported roles for each person that associates to the Atlas Integration. The following roles are supported for Atlas downloads.
|
Atlas Role (Role ID) |
MoversSuite Labor Type |
|
Estimator (6) |
coor |
|
Salesman (9) |
Sales |
|
Surveyor (10) |
OA Surveyor |
For the above roles, map them the Atlas Van Lines interface and specify their sales number from the Atlas system as the User ID for the appropriate labor area. The identifier is typically the agency identifier followed by the employee code in the following format (where AAAA is for the agency and EEE for the employee code):
AAAA-EEE
For example, if the agency code is 1993 and employee code for a salesperson is 98, then you enter a User ID of 1993-098.
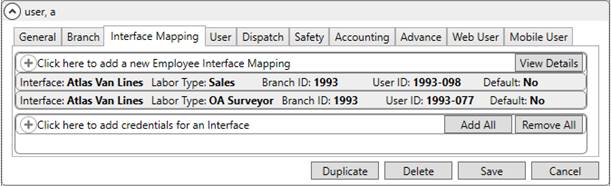
Figure 25: Interface Mapping tab within Personnel Setup
Manage salesperson and coordinator assignments through the Name, Address, Phone tab.
Manage OA surveyor assignments through the Agents tab.
For drivers, enter their identifier as the Driver Number within the Dispatch tab. Reference the same format as mentioned above with the agent code followed by the employee code.
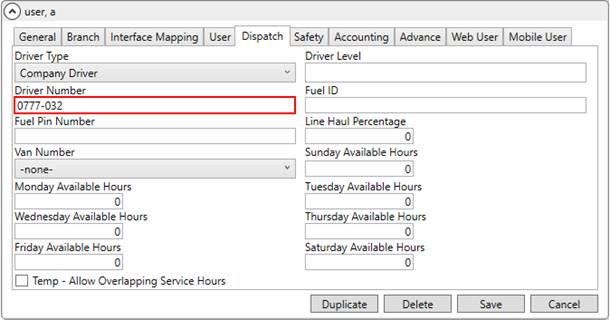
Figure 26: Dispatch tab within Personnel Setup
If Auto Dispatching, then verify that the system is setup, as detailed within the Auto Dispatching topic.
If you wish to grant user access to the Atlas Statement option through the Import option within Payment Management, then assign a single branch record with the Security Module of Atlas Statement Integration within Security Profile Setup. Only one record needs to be assigned to a profile to grant users to this function. NOTE: The Atlas Statement Integration module must also be enabled (see Security Modules).

Figure 27: Security Profile Setup
View driver assignments of an order through the Agents tab and through the Long Distance Dispatch module.
Shipment Status Setup
Define the Shipment Status codes supported by the various Atlas Integration processes within the Shipment Status Setup. Establish links between the Atlas Van Lines interface and the following supported codes. NOTE: The items needed to support each process and the descriptions do vary between process; for example: CMP represents a Delivered shipment for the Flat File Order Download or represents Complete for XML Order Download.
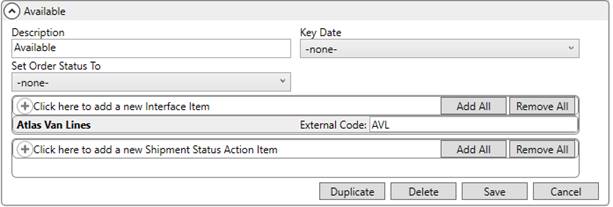
Figure 28: Shipment Status Setup
|
External Code |
Description |
|
AVL |
Available or Available (No Hauler) |
|
CAN |
Cancelled |
|
CAP |
|
|
CMP |
Complete or Delivered |
|
DSP |
Dispatched |
|
EXC |
|
|
GOLIVE |
Accepted and Live Shipment |
|
PLN |
Planned or Available (Hauler) |
|
PND |
Undecided (PND) |
|
SIT |
In Dest Storage or Storage-in-Transit |
|
SITO |
In Origin Storage or SIT at Origin |
|
STD |
Started/In Transit |
|
UNA |
Unaccepted |
|
UNB |
Agency Review Required |
|
UND |
Undecided (UND) |
|
UNLIVE |
Cancelled Unaccepted Shipment |
|
UNP |
Unprinted Reg Card |
|
UNR |
Rejected Shipment |
|
WADV |
Will Advise or Will Advise Dates/Weights |
Manage and track shipment progress through the Shipment Status History function.
Statement Payment Code Setup
Establish payment codes within Statement Payment Code Setup to support of Atlas Settlement Statement Import process.
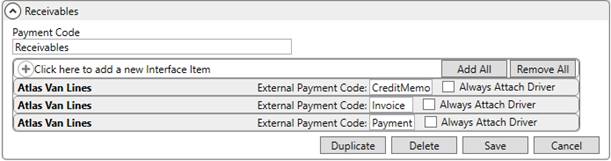
Figure 29: Statement Payment Code Setup
|
Payment Code |
External Payment Code |
|
Receivables |
CreditMemo |
|
Receivables |
Invoice |
|
Receivables |
Payment |
|
Payables |
MiscCharge |
|
Payables |
Return |
Statement payment codes are utilized within the Payment Management module.
Valuation Setup
Verify that the following External Code values are established within Valuation Setup.
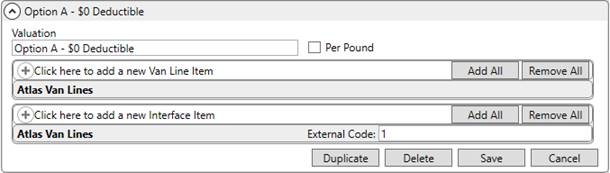
Figure 30: Valuation Setup
|
External Code |
Description |
|
1 |
Option A - $0 Deductible |
|
2 |
Option B - $250 Deductible |
|
3 |
Option C - $500 Deductible |
|
4 |
Depreciated Value |
|
5 |
High Value |
|
6 |
Replacement Cost |
|
7 |
Legal Liability |
|
8 |
Exhibit Guard |
|
9 |
High Value Protection No Certificate |
|
A |
Government Val (CA Booking Division) |
|
B |
Declared Value (CA Booking Division) |
|
C |
Released (Local Haul Mode) |
|
D |
Local Val (Local Haul Mode) |
Manage valuation and related options through the Move Information tab.