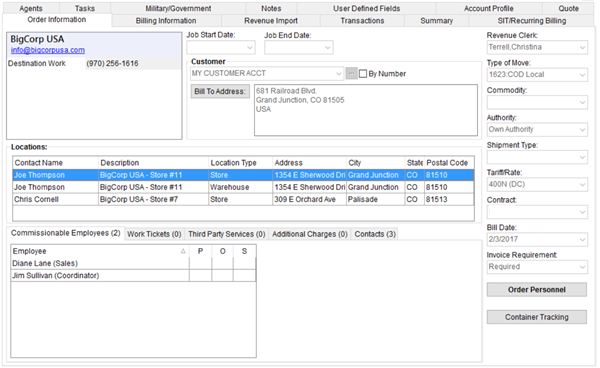
The Order Information (Office & Industrial) tab in Revenue Entry provides the user with the ability to set a revenue clerk and confirm key billing data such as move type, commodity, customer being billed as well as view the key locations, commissionable employees, contacts, and more.
Figure 5: Order Information (Office & Industrial) tab
Technical Field and Function Information
The following table describes the fields available within this tab.
|
Field/Function |
Description | ||||||
|
Shipper Contact Information |
| ||||||
|
Last Name/Company Name |
Enter the last name or company name of the shipper (up to 26 characters). | ||||||
|
First Name/MI |
Enter the first name of the shipper (up to 16 characters). | ||||||
|
|
Enter the email address for the shipper (up to 120 characters). Once the record is saved, users can click on the email address set here and the application will evoke the system default mail utility (such as Microsoft Outlook) placing the email address set here as the message recipient. | ||||||
|
Phone Numbers |
Select a phone type and enter the corresponding phone number for each contact phone number provided for the shipper. Phone types are defined with Shipper Phone Type Setup and affect several imports including those from Atlas, SIRVA, and UniGroup.
Phone Numbers for most phone types affect Bookmarks data (see Order Information Bookmark Fields).
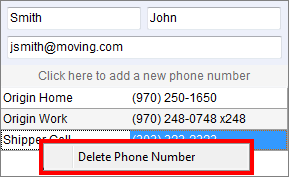
Use a right-click option to remove a phone number.
Figure 6: Right-click option to remove a phone number entry
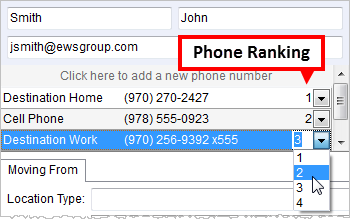
Users can rank phone numbers to give them a priority in the listing. Lowest numbers appear at the top of the listing and non-ranked numbers list after the ranked ones.
Figure 7: Phone number ranking
| ||||||
|
| |||||||
|
Job Start Date |
Provide the anticipated starting date of the project. This date is also managed through the Contacts and Locations tab. | ||||||
|
Job End Date |
Provide the anticipated ending date of the project. This date is also managed through the Contacts and Locations tab. | ||||||
|
Division |
View/update the division from the list. This field is visible only when Divisions is enabled. | ||||||
|
Customer | |||||||
|
Customer |
Select the customer billed for the item using the drop-down menu selector or by using the Customer Find. Users can choose to view the customer by their name (default) or By Number.
Note: Manage customer records through Microsoft Dynamics.
| ||||||
|
|
Bill To Address (Alt+B) This section displays the billing address for the selected customer. Press Bill To Address button to open the Choose Billing Address screen where a user can select a different address to bill. | ||||||
|
Locations | |||||||
|
This section lists the locations associated to the order. Manage these records through the Contacts and Locations tab. | |||||||
|
| |||||||
|
Revenue Clerk |
Select a clerk responsible for processing revenue for the order. This setting is also accessible through Billing Information.
Note: Revenue clerks are employees with a Status of ACTIVE and a Labor Type of Revenue Clerk within their Personnel Setup record.
| ||||||
|
Note: The Type of Move, Commodity, and Authority fields are integral to building the correct general ledger number in posting revenue. | |||||||
|
Type of Move |
View/update the move type assigned to the order. This setting determines how the revenue of a move request is processed. See Move Type Setup for further information. This setting is also accessible through the Type of Move field in Move Information. | ||||||
|
Commodity |
View/update the commodity assigned to the order. The commodity determines how general ledger accounts are defined for transaction processing. This setting is also accessible through Move Information. | ||||||
|
Authority |
View/update the authority assigned to an interstate or intrastate order. The authority can be set to either Own Authority if the moving company is responsible or Van Line if the responsibility of the move is through a van line. This setting is also accessible through Move Information. | ||||||
|
Shipment Type |
Enter the shipment classification from the list defined within Shipment Type Setup. This field setting is integral to processes involving data exchange between third party applications, such as SIRVA, UniGroup, and TransDocs. | ||||||
|
Note: Reference the Tariff/Rate and Contract settings for data related to rating of local services | |||||||
|
Tariff/Rate |
Set the tariff or rate assigned to the order. This setting represents the tariff for van line rating imports or a rate when computing revenue and billed services internal to MoversSuite. See Rate Plan Setup for more information.
This setting is also accessible through Billing Information. | ||||||
|
Contract |
View/update the contract assigned to the order. This setting is the local tariff or national account contract number used for an own authority order (up to 12 characters). This setting is also accessible through Billing Information. | ||||||
|
Bill Date |
Enter the date that all billing is complete for an order (typically occurs when the Order Status is changed to Completed). Refer Date Fields for data entry information. See the Orders Billed Report for a detailed listing of reports based on a Bill Date range. | ||||||
|
Invoice Requirement |
This option allows the user to determine whether the order will display on the Orders with Revenue not Invoiced Report or not. See Invoice Requirements Setup for details. This setting is also accessible through Billing Information. | ||||||
|
|
Order Personnel (Alt+P) This function opens the Order Personnel screen allowing you to view personnel assignments on the order. | ||||||
|
|
Shipment Information (Alt+D) This function opens the Shipment Information screen allowing you to manage shipment specific information, such as shipment requirements, trade show information, and packaging needs. | ||||||
|
|
Container Tracking This function opens the Container Management screen allowing you to manage containers on the order or for the entire system. | ||||||
|
Commissionable Employees | |||||||
|
This section displays the personnel associated to the order that are eligible to receive a commission based on services completed for the order. Only employees listed here are eligible for a commission. The tab displays the name of the employee along with their assigned labor type (in parenthesis). View the Employee Commission Plans Report to see a list of employees by labor area along with their vendor and commission plan settings. | |||||||
|
Work Tickets | |||||||
|
Work Tickets This section displays the local services for this order that have actual entered for them through the Enter Actuals screen. See Update Containers, Packing and Unpacking for more information.
Note: A count of items displays within the button text.
Enter Service Actuals (Alt+N) Use this option to access the Enter Actuals screen for the selected item.
| |||||||
|
Third Party Services | |||||||
|
Third Party Services This section displays the third party services created for the order through Third Party Services.
Note: A count of items displays within the button text.
Add (Alt+A) Open the Add Third Party Item screen using this option.
Edit (Alt+I) Open the Add Third Party Item screen in edit mode for the selected record using this option.
Delete (Alt+D) This option removes the selected record permanently after prompting the user to confirm the request.
| |||||||
|
Additional Charges | |||||||
|
This section displays Additional Charges placed on the order.
Note: A count of items displays within the button text.
Add (Alt+A) Open the Add Charges screen using this option.
Edit (Alt+I) Open the Add Charges screen in edit mode for the selected record using this option.
Delete (Alt+D) This option removes the selected record permanently after prompting the user to confirm the request.
| |||||||
|
Contacts | |||||||
|
This section lists the contacts associated to the order. Manage these records through the Contacts and Locations tab. | |||||||
 to access