Claims > Handling Revenue/Expenses button
Access this screen through the Expenses tab in Handling Revenue/Expenses. Use the Add Handling Expense screen to enter an amount against a vendor. It will generate a payable. As an example, this screen is used when customer hired an outside company to process their claims. For every claim they processed, they received a fee; your company owed that processing company the charge.
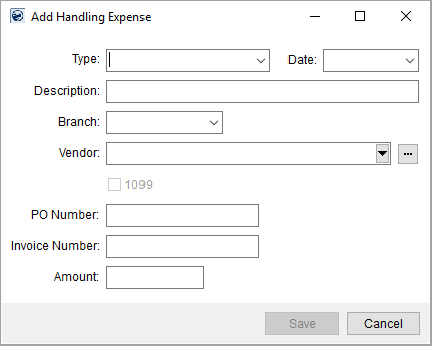
Figure 24: Add Handling Expense screen
To use the Add Handling Expense screen:
1. Click Handling Revenue/Expenses button from within Claims > Claims tab.

2. Click the Expense tab, as indicated in Figure 25.
3. Click Add.

Figure 25: Handling Revenue/Expenses > Expenses tab
4. From the Add Handling Expense screen, eanter the Type.
5. Enter the Date.
6. Enter the Description - “Settlement Fee” for example.
7. Enter the Branch.
8. Enter the Vendor.
9. Enter the Invoice Number (must be unique).
10. Enter the Amount.

11. Click Save. The expense will list under the Expenses tab.

Figure 26: Use the scroll bar to see all the information set on the Expense.
To edit an expense, from the Handling Revenue/Expenses pane > Expenses tab, click on the expense and then Edit. Edit as needed and click Save.
To delete the expense, from the Handling Revenue/Expenses pane > Expenses tab, click on the expense and then Delete. A confirmation screen appears to make sure you would like to continue with the deletion.
To exit out of the Revenue/Expenses pane, click the Handling Revenue/Expenses button to collapse that pane and go back to being able to view the Claims grid.
The following table lists the fields and functions within this screen.
|
Field/Function |
Description |
|
Type |
Select type from the list of values defined in Claim Handling Type Setup to link the record to an Item Code. |
|
Date |
Select a handling date for the item. See Date Fields for entry options. |
|
Description |
Enter a text description of the item (up to 128 characters). |
|
Branch |
Select a posting branch from the list of those defined in Branch Setup. |
|
Division |
Select a division to post transactions under from the available list. See Divisions for more information. |
|
Vendor |
Use the Vendor Quick Find to locate and select a
vendor to associate this record. The list of options vendors pulls from
those defined within Microsoft Dynamics GP or from within Vendor Setup (depending on
setup). You can also access a list of recent vendors through the The Vendor selector includes the following columns to assist in selection: Vendor Name ID City State Status Hold Refer to Dynamics GP Status and Hold Information topic for more details.
|
|
|
1099 Flag Select this flag to report this transaction as a 1099. |
|
PO Number |
Enter the purchase order number for the expense item (up to 50 characters). |
|
Invoice Number |
Associate the invoice number of the transaction through this field (up to 30 characters). |
|
Amount |
Enter a dollar amount for the handling expense item. |
|
|
Save (Alt+S) Press Save to add the transaction item forhandling expense. |
|
|
Cancel (Alt+C) This function discards changes made. |
 button and utilize the
advanced
button and utilize the
advanced  .
.

