Generic Revenue Import allows you to import billing items from any source through a spreadsheet into MoversSuite. These items are processed through a series of guided steps that take the items all the way through to generated revenue transactions.
Overview
The process takes a formatted file, expected to be in one of three types (.csv, .xls, .xlsx) and allows you to import the file through the Generic Revenue Import option available through the Accounting Tools Menu. When you open the Generic Revenue Import, you are presented with a series of processing screens that navigate through verifying the import file contents, its necessary mappings, through to accounting transaction generation.
The transactions are linked to an order defined within the file. On subsequent imports, if the order exists, the transactions are added to the existing order. Otherwise, if the order does not exist a new order is created in MoversSuite.
The following is an overview of the steps involved with processing a Generic Revenue Import File:
1. Create the spreadsheet as outlined within Generic Revenue Import File.
2. Import this file into MoversSuite through the Generic Revenue Import option from the Accounting Tools Menu.
3. Use the guided steps within the Generic Revenue Import window to process the file.
4. View order and transaction data through the Transactions tab and Summary tab within Revenue Entry.
5. Optionally generate invoices.
6. Revenue personnel can post transactions associated to the import file within Dynamics GP.
Setup Information
File Layout Information
Usage Information
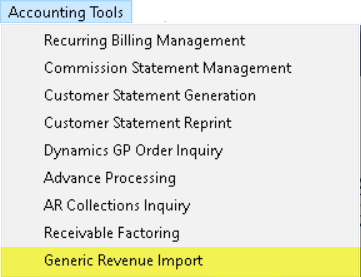
Generic Revenue ImportThe Generic Revenue Import window is available through the Generic Revenue Import option from the Accounting Tools Menu.
Figure 5: Accounting Tools Menu
This window provides a guide process of importing a file into MoversSuite with validation along each step. The table below details each step in the process of importing a Generic Revenue Import File. Refer to the Generic Revenue Import topic for an overview and setup information.
|
Step |
Description |
|
Step 1 |
Import Parameters The first step is to choose the location of the import file and set and save parameters needed to create the order and billing items. Choose the previously saved Import Parameters through this drop down. |
|
Step 2 |
Preview and Verify Data This step shows you the results of the import file processing. Errors and warnings received in this step can be corrected in the import file or within MoversSuite Administration. Reprocess the file by navigating back to Step 1 and pressing Next. |
|
Step 3 |
Importing Orders This step processes the file and builds or updates order records with transaction items. If you wished to import the items and leave them as non-generated transactions, you could cancel the import at the end of this step. |
|
Step 4 |
Transaction Dates Provide the Journal Date and Document Date for accounting transactions created for each imported item. |
|
Step 5 |
Generating Transactions Accounting transactions are generated and considered posted at the end of this step. |
Step 1 – Import Parameters
This step allows you to select a file along with selecting the parameters needed to establish records within MoversSuite.
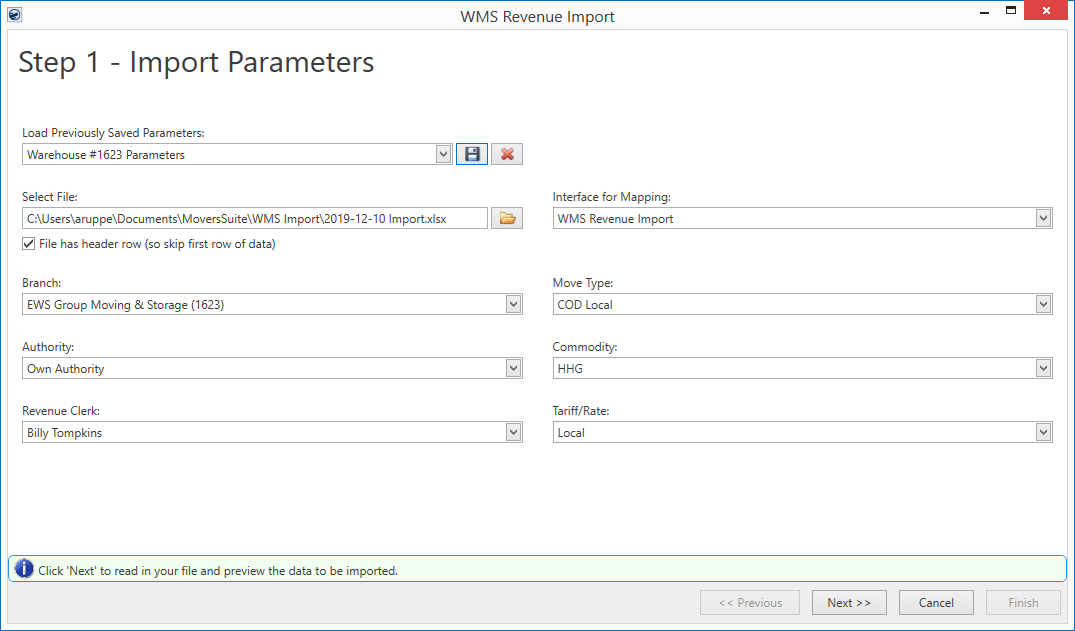
Figure 6: Generic Revenue Import - Step 1
Errors and warnings that appear in this screen show on the
field in error with an  or
or  for a
warning. There is also a message at the bottom of the screen with the error
description.
for a
warning. There is also a message at the bottom of the screen with the error
description.

Progress indicators and import status also appear at the bottom of the screen.


When working in this screen, the state of the bottom navigation buttons allows you to move from one step to the next. If errors exist that prevent you from moving to the next screen, then the Next button is disabled. Optionally, in an error state, you can navigate to the previous screen and make corrections as needed and then proceed again through the steps.
At certain points in the process, if you Cancel, then certain functions, such as transaction generation, may not occur. You will be prompted in such cases to confirm the cancellation.
Load Previously Saved Parameters
Use this feature to store all settings for future use. Select
from existing parameters by pressing  . Save the parameters through the dialog by
pressing
. Save the parameters through the dialog by
pressing  . If you wish to delete the parameters, then
press
. If you wish to delete the parameters, then
press  . Reference the Save Parameters For Future
Imports topic for more information on this function.
. Reference the Save Parameters For Future
Imports topic for more information on this function.
NOTE: You can save parameters for each import file type, warehouse, branch settings, etc.
Select File
Press  to choose a file through the Open dialog. The prompt only allows you
choose one of the supported types (see Generic Revenue Import File). If your
import file contains a header row, then make sure to check the File has
header row box, so that this line is not processed.
to choose a file through the Open dialog. The prompt only allows you
choose one of the supported types (see Generic Revenue Import File). If your
import file contains a header row, then make sure to check the File has
header row box, so that this line is not processed.
NOTE: Once you have referenced a file for an import, the location of the file is saved. Therefore, the next time you wish to open a file, the Open dialog automatically opens to that directory.
The following is a list of parameters required to process an import file. These parameters are saved through the Save Parameters For Future Imports function.
|
Parameters |
Description |
|
Interface for Mapping |
Select the appropriate interface for the import from the records defined within XML Interface Setup. This setting determines what items can be imported along with determining whether salespeople are commissionable for these items. |
|
IMPORTANT: The following four fields are needed to generating GL for accounting transactions associated to the imported items. These fields must be set appropriately for the given interface. If not set correctly, mapping errors will occur on subsequent steps. | |
|
Branch |
Select the revenue/AR branch you wish to generate transaction for all imported items under. The Branch setting determines what other parameters may be available. Choose a branch from those defined within Branch Setup. The list of branches available to you are those that are defined for you within your Security Profile Setup record. |
|
Move Type |
Select a type from those defined within Move Type Setup. This parameter shows as the Type of Move set within the Move Information tab. |
|
Authority |
Select a type from those defined within Authority Setup. This parameter shows as the Authority set within the Move Information tab. |
|
Commodity |
Select a type from those defined within Commodity Type Setup. This parameter shows as the Commodity set within the Move Information tab. |
|
NOTE: The following two fields are needed to allow you to view the transaction information within the Revenue Entry module. | |
|
Revenue Clerk |
Choose the clerk assignment from the list of personnel available. The people available through this option are those active employees with a Labor Type of “Revenue Clerk” within their Personnel Setup. |
|
Tariff/Rate |
Select a plan from the list of those defined within Rate Plan Setup. |
Step 2 – Preview and Verify Data
The application processes each line of the import file and presents the data in Step 2 for you to preview and verify. The data presented in the grid correlates to the same data outlined for the Generic Revenue Import File.
IMPORTANT: The import process does not update existing orders. If you are importing a file that updates existing orders, the parameters set within Step 1 may not match what is on the existing order. In such cases, this may cause mapping errors in Step 5. The order can be manually updated to reflect the new import file parameters either prior to the import or during.
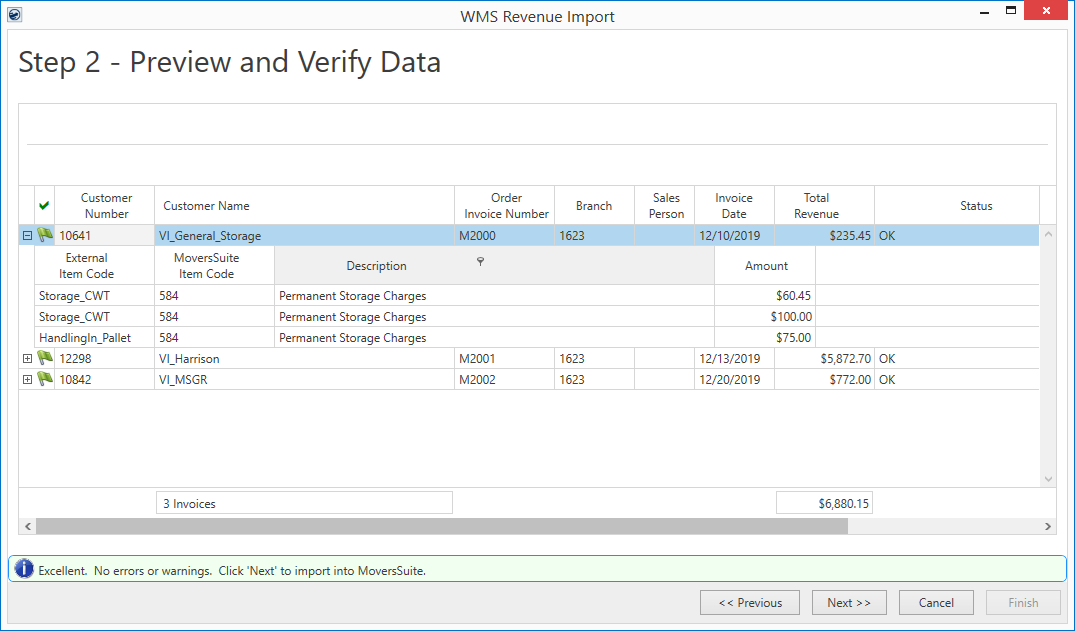
Figure 7: Generic Revenue Import - Step 2
From this window, you can confirm the customer and order information along with viewing the item and grand revenue totals. Nothing has been imported into MoversSuite, so if changes are needed, press the Previous button, make changes either to the Generic Revenue Import File, or within MoversSuite Administration, and then press the Next button from Step 1 to reprocess the data.
Errors and warnings show prominently when they exist in this step. Details of the error or warning show in the Status column. The Next button is disabled until there are no errors; you can proceed on warnings.
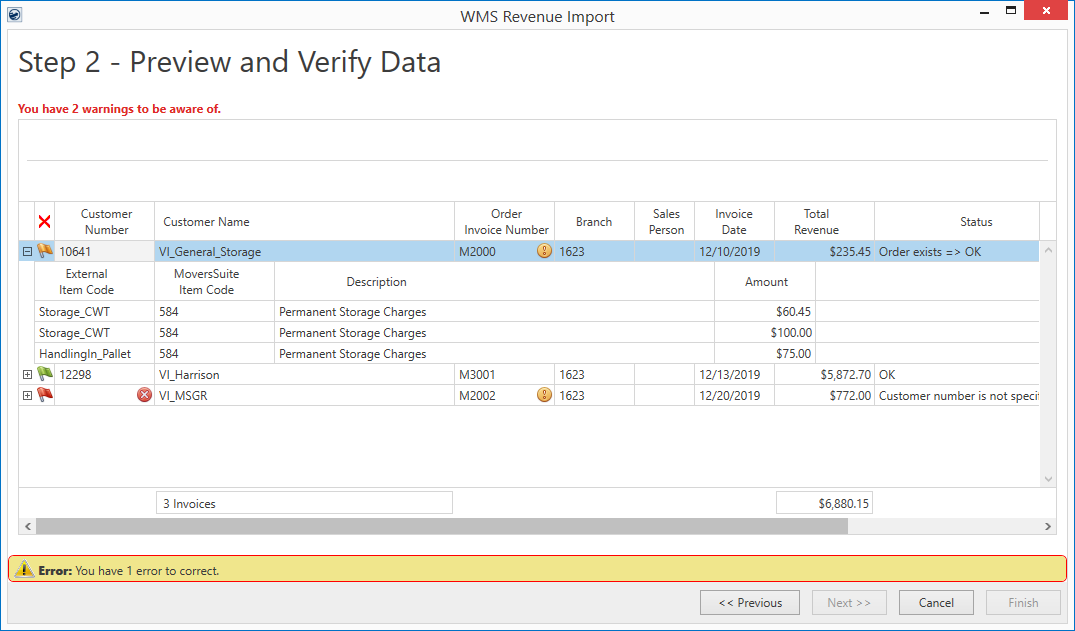
Figure 8: Generic Revenue Import - Step 2 (with errors)
To view order details, press  . To
hide the details, press the
. To
hide the details, press the  button. Optionally, two right-click
options are available to you to expand or collapse all detail lines.
button. Optionally, two right-click
options are available to you to expand or collapse all detail lines.
Import Status Flag
The import status of an order is indicated by a flag in the
first column. This column displays  if there are errors and displays
  when
no errors exist.
when
no errors exist.
|
Import Status |
Description |
|
|
No errors |
|
|
Warnings exist. On or more data on the import contains a
warning: |
|
|
Errors exist. On or more data on the import contains an
error: |
Technical Field Information
The following table contains information on the data presented within Step 2.
|
Field |
Description |
|
Order Header |
|
|
Customer Number |
The billed customer assigned to the order record through the Customer setting within Billing Information. This setting maps to the Customer No column (Column B) within the Generic Revenue Import File. |
|
Customer Name |
Warehouse or customer name on the invoice order and is set as the Last Name/Company Name within the Name, Address, Phone tab. This setting maps to the Customer Name column (Column A) within the Generic Revenue Import File. |
|
Order Invoice Number |
The invoice or order number associated to the billing items displays as shown as the Order Number in MoversSuite. This setting maps to the Invoice No column (Column C) within the Generic Revenue Import File. |
|
Branch |
The branch that revenue will generate to displays. The Branch is defined as a parameter in Step 1. |
|
Sales Person |
If a mapping exists that associate imported items for an order to a salesperson, then the name of that person displays in this column. The Salesperson is set on an order within the Name, Address, Phone tab. This setting maps to the Sales Person column (Column G) within the Generic Revenue Import File. |
|
Invoice Date |
The date assigned to the invoice generated on a disparate system. This date is mapped to the Book Date field in MoversSuite. This setting maps to the Invoice Date column (Column D) within the Generic Revenue Import File. |
|
Total Revenue |
Total dollar amount of all revenue items under this order. |
|
Status |
Progress indicators, warnings, and errors from the import for the order display in this column. |
|
Order Warnings |
If you are importing an order that already exists in your system, then warnings that may arise during the import display in this column. Specifically, if there is a mismatch between the parameters set on the new import and those of the existing order, then those mismatches display in this column, e.g. “Move Type does not match” |
|
Transaction Details |
|
|
External Item Code |
The code from a disparate system used to identify the item being imported. This value must be mapped to an Item Code in MoversSuite (which displays in the MoversSuite Item Code column). This setting maps to the ItemId column (Column K) within the Generic Revenue Import File. |
|
MoversSuite Item Code |
The MoversSuite Item Code that was defined in XML Item Code Setup that matches the imported External Item Code displays. Revenue is generated for this Item Code. Item Codes are defined within Item Code Setup. |
|
Description |
Description or name of MoversSuite Item Code displays, as defined within Item Code Setup. |
|
Amount |
Dollar amount of the imported revenue item displays. This setting maps to the Amount column (Column F) within the Generic Revenue Import File. |
|
Totals |
|
|
Invoice Count |
Total of all orders (or invoices) updated or added from this import. |
|
Total Revenue |
Total dollar amount of all transaction items being imported. |
Step 3 – Importing Orders
With this step, orders are added or updated within MoversSuite and transactions established for each item in the file under those orders.
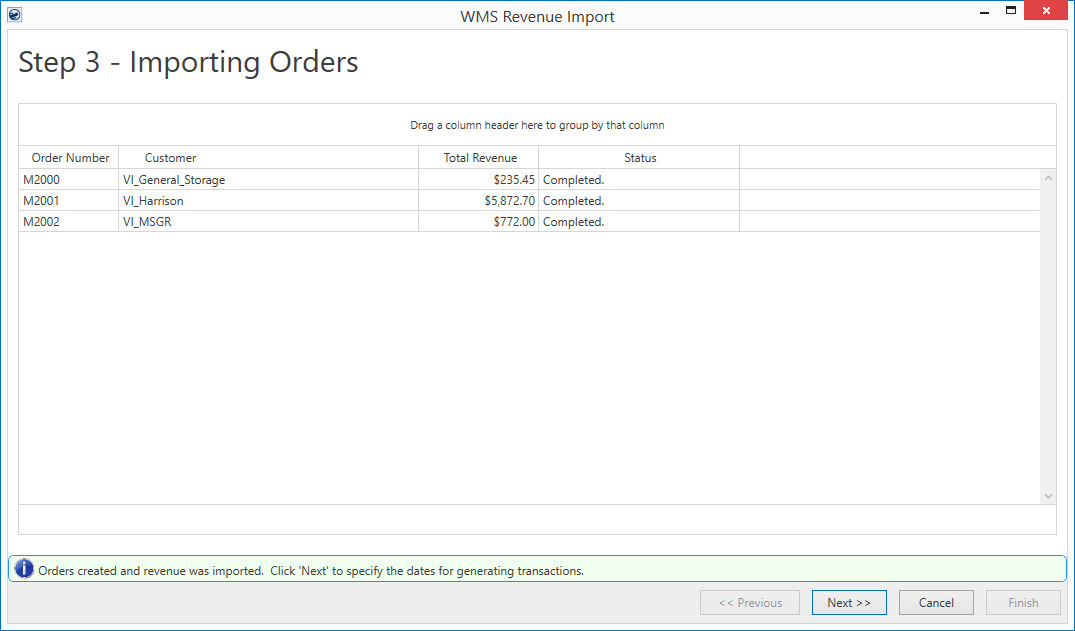
Figure 9: Generic Revenue Import - Step 3
IMPORTANT: The import process does not update existing orders. If you are importing a file that updates existing orders, the parameters set within Step 1 may not match what is on the existing order. In such cases, this may cause mapping errors in Step 5. The order can be manually updated to reflect the new import file parameters either prior to the import or during.
The Status column provides information on whether the import has completed for the line along with any errors or warnings that an order may receive. At this point, the Previous button is disabled. If any corrections are needed to be done to the orders, then they must be done manually outside of the Generic Revenue Import window.
If you wished to import the items and leave them as non-generated transactions, you could Cancel the import at the end of this step.
Utilize the Find and Quick Find to search and view orders imported through this process.
Step 4 – Transaction Dates
Provide the transaction dates necessary to create accounting transactions within the Microsoft Dynamics GP database. These dates should be within the open period of your Dynamics GP databases. The import wizard also asks you to provide the following data to be logged, in case of successful transaction generation:
1. Updating the Bill Date (Used to generate the Orders With Bill Date Report)
2. Updating the Order Status (Used to log Order History)

Figure 10: Generic Revenue Import - Step 4
Specifying the two update fields will help MoversSuite update its records and reports accordingly such as Shipment Status History, Order History and Orders With Bill Date Report etc.
Refer to the Transaction Dates topic for more information on the purpose of these dates.
Step 5 – Generating Transactions
During this step, accounting transactions are generated for each revenue item imported. After the completion of this step, transactions on each imported order are considered posted.
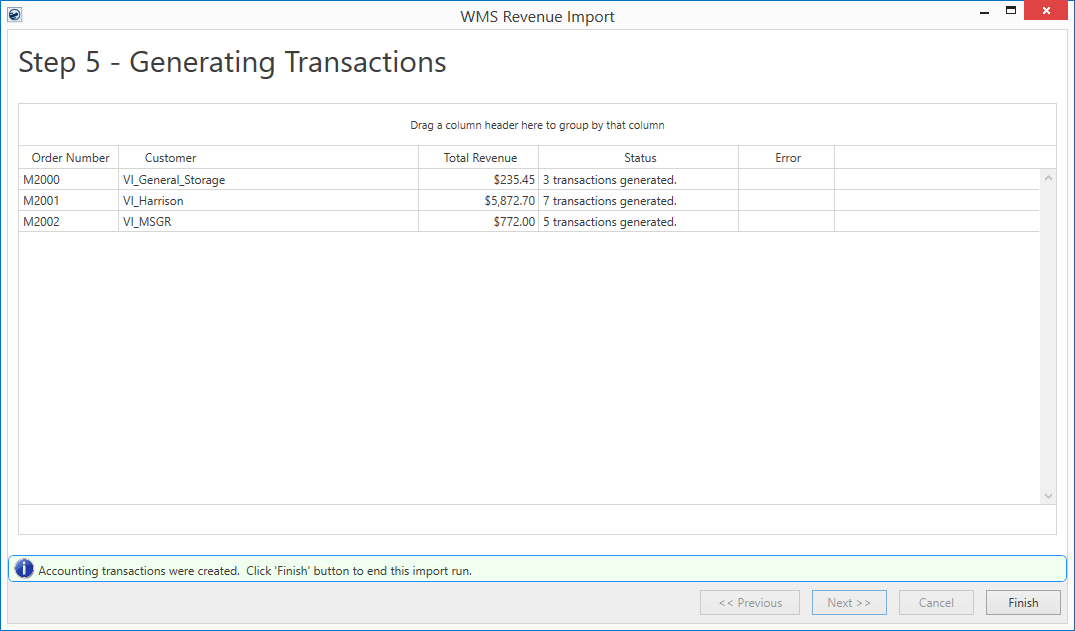
Figure 11: Generic Revenue Import - Step 5
If errors are present during this step, then you can view the
errors by clicking  within the Error column. This
opens the Generating Transactions Errors screen where you can view the
specifics.
within the Error column. This
opens the Generating Transactions Errors screen where you can view the
specifics.
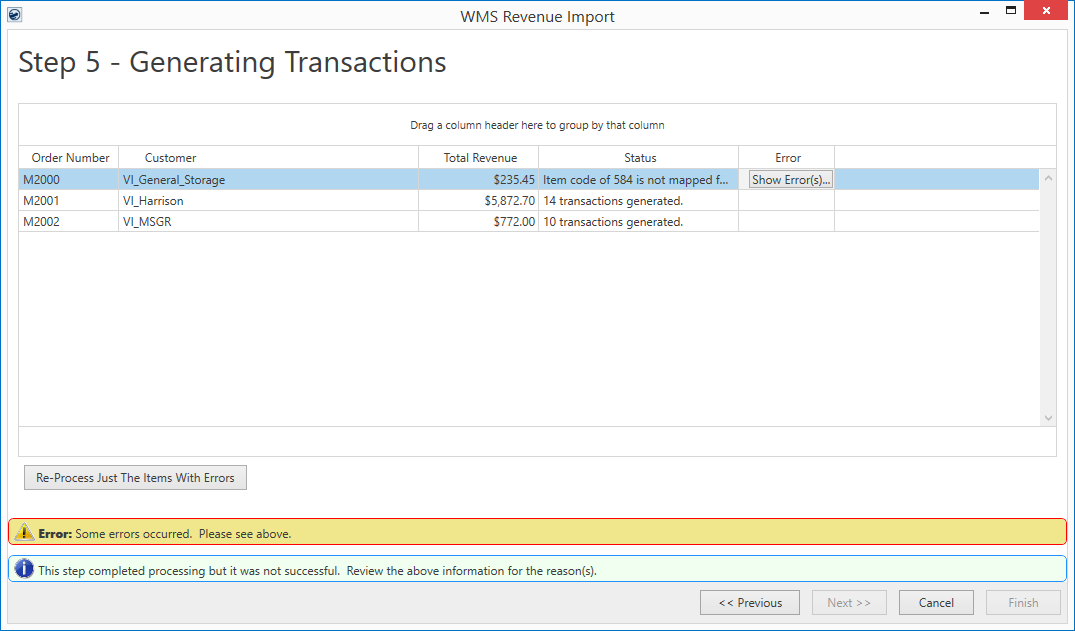
Figure 12: : Generic Revenue Import - Step 5 (with errors)

If the errors presented are for the transaction dates, then you can press Previous and correct the dates and then press Next within Step 4 to reprocess. Otherwise, errors related to administrative setup or on the order itself can be made at this point and once those changes are made, you can attempt to build accounting transactions for all non-generated items by pressing the Re-Process Just The Items With Errors button.
Note: Coming back to Step 5 after Step 4, the order update options will apply to:
•Invoices that were previously generated successfully and you chose “No” for both the update options on the first pass
•Invoices that had errors on the previous run and are now successfully generated in this new run
You can repeat this step as many times as needed. You can also cancel out of the screen and process the order(s) with errors manually.
Changes made to the order can cause mapping errors. An example of this is if an order is created during one import with a certain set of parameters then a subsequent import occurs with different parameters, then errors may result. This is due to the import process not updating field values on the order, such as the Type of Move, Commodity, Authority, etc. So, if an order exists and you are receiving mapping errors, you may need to open a second session of MoversSuite and update the field causing the mapping error and then reprocess.

If all transactions generate without errors, then the Finish button is enabled and can pressed to close out of the window.


