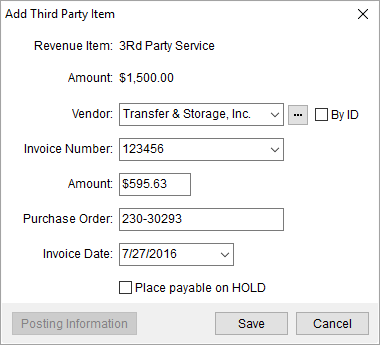
The Add Third Party Item dialog allows a user to create a separate payable to a vendor. The payable must be associated to an existing revenue item and a user can add the payable through the through the Add Item > Third Party menu in Transactions.
Figure 38: Add Third Party Item
The following table describes the fields and functions available within the Add Third Party Item dialog.
|
NOTE |
|
The description of the payable as it displays in the Transactions data grid shows as “3rd Party – “ followed by the vendor name. |
|
Field/Function |
Description |
|
Revenue Item |
The description of the revenue item that the payable is under will display in this field. |
|
Amount |
This field lists the Revenue Amount of the item that the third party payable is under. |
|
Vendor |
Select the third party from the list of vendors in the drop-down menu, which provides sorted data including vendor name, vendor ID, status, and hold status. The vendor selected affects the list of invoices that appear within the Invoice Number by default.
Press the ellipses button to access the Vendor Find screen to assist in locating appropriate vendor. Select By ID to display the vendor identification number instead of the vendor name.
Note: Manage vendor data through Microsoft Dynamics GP.
|
|
Invoice Number |
Enter an invoice number of the payable (up to 20 characters). Additionally, users can select from the existing third party invoices existing items for the same branch assigned to the revenue item. Note: Invoices generated for third party items that relate to an adjustment or a reversal are not available to other third party items. The selector displays invoices associated to the selected Vendor. Additionally, the menu displays the Vendor Name and Vendor ID associated to the invoice. Third party payables generate unique document numbers within Microsoft Dynamics GP even if multiple vendors are linked to the same invoice. If an existing invoice is selected, the Vendor, Purchase Order, Invoice Date, and Place payable on HOLD flag will default to the values defined for the existing invoice. |
|
Amount |
Enter the dollar amount of the payable (negative values are accepted). |
|
Purchase Order |
Enter the purchase order number of the payable (up to 30 characters). |
|
Invoice Date |
Enter the date of the invoice (see Date Fields for entry options). |
|
Place payable on HOLD |
Check this flag to set the On Hold flag on accounting transaction created for this payable. A hold on a third party payable is only removed during the BAT process and if the document is fully applied. |
|
|
|
|
|
Posting Information This option opens the Posting Information dialog allowing the user to view key data for a posted item. The Posting Information button is available for posted items only. See Dynamics GP Order Inquiry for more data on posted items. |
|
|
Save Users can press Save to add or update the third party record and close the screen. |
|
|
Cancel Selecting Cancel will discard any changes made and close the screen. |
|
NOTE |
|
The BAT Process sets all third party transactions for the same Invoice Number to have the same Document Number, Voucher Number, Document Date, Journal Date, Vendor Number, PO number, vendor invoice number, 1099 flag, on-hold flag, and Branch ID when processed. |
RELATED TOPIC:


